Using Motion Capture Files with a Biped
Motion capture file formats include BIP, BVH, and CSM. BIP files are the easiest to work with, try to use them if you can. This tutorial assumes you have a biped rigged character ready in 3DS Max.1) Select the Biped. Under the Motion tab, find the Motion Capture section.
2) Click the “Load Motion Capture File” button and select the file.
At this point you will be able to preview the animation before making any adjustments.
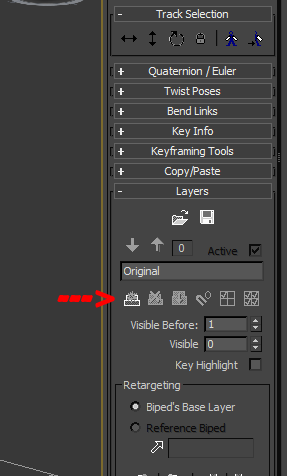
Adding Layers
At this point you may want to make adjustments to the animation. You can do this through the use of Layers.
1) On the Layers rollout (under the motion tab), click Create Layer.
2) Turn on Auto Key and animate like you normally would (in this example I simply lifted his left arm).
– The red stick figure represents the original motion.
Creating a Walk Loop
Often times animations will have the character walk around in world space, but for machinima purposes you may not want them to leave their starting position (so you can keyframe their movement in the game engine instead). This is easy to fix.
1) Create a new biped layer.
2) Select the root bone (usually Bip001).
3) Turn on Auto Key.
4) Set the Y position of the first and last keys to 0 (right-click the move tool and enter the value).
Tips
– Check how the hands and fingers look during animations. A closed hand will often looks more natural.
Converting BVH to BIP
Batch convert BVH to BIP
Reducing Keys
One thought on “Using Motion Capture with a Biped”